Authorization administrators can add and delete Report Gateway users and configure their permissions on the Manage Users page. Report Gateway uses two types of permissions:
1. Security roles determine the reports that a user can view and run.
2. Admin privileges determine which administrative tasks a user can perform.
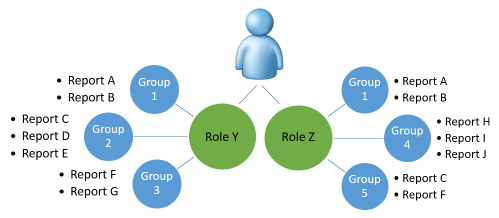
Security roles grant access to specific groups of reports based on business function. Admins assign the appropriate users to a security role to authorize those users to run reports.
Administrator privileges determine whether a user can perform administrative functions in addition to simply running reports. A user must have access to a function in order to open the corresponding page in Report Gateway and to see links to the page. A user with no administrative privileges will not see the Admin Settings link on the top menu bar.
▪ Standard User (no admin privileges)—Can run and view reports based on their security role.
▪ Report Administrator—Can add, modify, and delete client-specific reports, and upload or export client-specific report packages.
▪ Authorization Administrator—Can add, modify, and delete users associated with their client ID, set up security roles, and assign users to security roles. Authorization administrators can also view user, security role, and report audit reports.
▪ System Administrator—Can add, modify, and delete any user for any client ID. Configures platforms, data sources, and standard MRI reports for MRI Report Gateway. System Administrators can also view any issues which occur within Report Gateway.
▪ Support Administrator—For MRI Software use only. Can switch between multiple clients to access their Report Gateway sites and review issue logs for support purposes. Support administrators can run reports, schedule reports, and create parameter presets, but cannot change any Admin Settings.
▪ Delegation Administrator—For MRI Software use only. Can assign users to the following security roles: Report Administrator, Authorization Administrator, and Support Administrator.
Note
The roles above can be combined to give users additional access. For example, a user that has both the Support Admin and Report Admin role can administer reports for all clients.
The first user to run Report Gateway after it is configured is granted all administrative privileges. This user can then configure the other users with the appropriate roles and privileges. Otherwise, users will be able to open Report Gateway, but cannot view or run reports or perform any administrative tasks.
The Manage Users page includes filters to help you locate users.
Use the Client or UserName fields at the top of the page to filter users as you type.
Set an Admin drop-down field to Y or N to display only the users which do or do not have that administrative privilege.
Note
Only system administrators will see the Client and System Admin columns.
As of February 13th, 2019, users are added and authenticated through Okta. SaaS clients using MRI Property Management version 10.4 must submit a support ticket after adding users to have their users provisioned in Okta, or the users will encounter errors when they attempt to log in. We recommend creating a single support case containing a batch of user details rather than a separate case for each user. Clients who are on version 10.5 or higher do not need to submit a support ticket.
To add a user, follow these steps:
1. Go to Admin Settings > Users.
2. Click Add user.
3. In the Identity field, enter the appropriate username based on your environment.
Note
SaaS clients using version 10.4 should enter the MRI username. After adding users this way, you will be required to submit a support ticket to get the users provisioned for Okta.
SaaS clients using version 10.5 and above should enter the user's email address and select the Using an alternate username check box.
On-premise clients must enter an ID that matches the external identity configured for the user in your identity provider; i.e., the IdP name claim value. Contact a system administrator for assistance if necessary.
4. In the Display Name field, enter a display name for the user. This information will be replaced by the name provided by the identity provider if it is provided when the users logs in.
5. Click Add. You are returned to the Users page.
6. In the Security Roles field, select at least one security role for the user.
7. Select which admin privileges the user has. For more information, see the "About Admin Privileges" section above.
8. Click Save.
Note
A user is automatically added to Report Gateway when they log in directly using the URL. However, these users will have no security roles or admin privileges until an authorization admin manually configures them.
1. Go to Admin Settings > Users.
2. Modify the security roles and/or admin privileges for the users.
3. Click Save.
Note
You cannot remove system admin permission from yourself, or remove authorization admin permission from yourself if you’re an authorization admin but not a system admin.
1. Go to Admin Settings > Users.
2. Select the check box along the left side for each user you need to delete.
3. Click Delete users.
4. Click Save.
Note
You will not be asked to confirm the deletion. The users will be deleted immediately.
You cannot delete your own username.
Click User Security Report to view a matrix of users and security roles. See Running the User Security Report.
Click Permissions Audit Report to view an audit report of security changes. See Running the Permissions Audit Report.